Lesson #3: Smart Notebook...more!
In Lesson #2, you started learning the basics of SMART Notebook. In this lesson, we will expand upon that knowledge and learn about some additional features that will be helpful while using the SMART Board in the classroom. By viewing the tutorials, reviewing the readings , and completing the hands-on section you will find out how to: work with objects, add items from the gallery, use the camera function, and much more!
As mentioned in Lesson #2, SMART Technologies has published a helpful guide to walk you through the software
As mentioned in Lesson #2, SMART Technologies has published a helpful guide to walk you through the software
By the end of this lesson, you will be able to......
1....add objects from the Gallery into a SMART Notebook file.
2....work with objects in a SMART Notebook file-resize, flip, lock, order.
3....add links to objects in a SMART Notebook file (link to a website or file.
4....use the camera function to capture and add a screenshot into your SMART Notebook file.
2....work with objects in a SMART Notebook file-resize, flip, lock, order.
3....add links to objects in a SMART Notebook file (link to a website or file.
4....use the camera function to capture and add a screenshot into your SMART Notebook file.
Getting to know "objects" in SMART Notebook

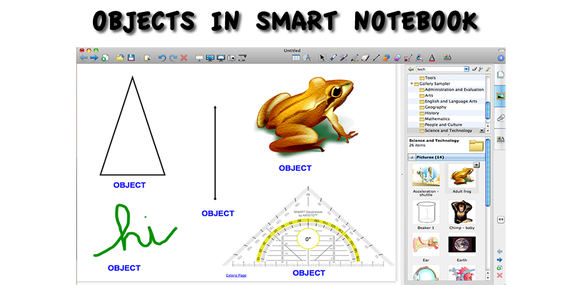
An important point to learn is that everything you add to a SMART Notebook page is considered an "object". Every object can be manipulated. In this lesson, you will learn how to add a shape, insert a picture, and add images from the gallery. Each of those items is considered an "object".
To make changes to objects is very easy in SMART Notebook. You can click and drag an object anywhere on your SMART Notebook page. In addition, you can right click on an object and get a list of all of the possible choices for manipulating objects.
After the tutorials, make sure to spend some time getting comfortable with objects in SMART Notebook.
Helpful Tool: Camera

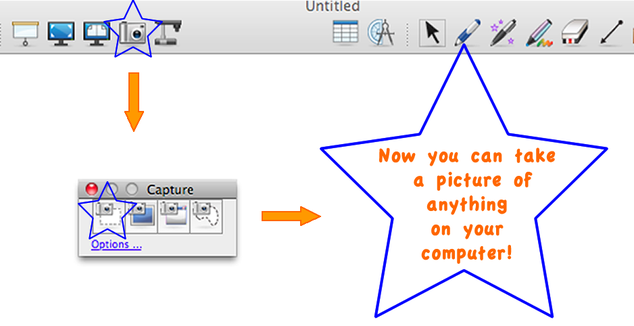
A very powerful (yet not always well-known) feature of SMART Notebook is the camera toolbar. This allows you to take a picture of anything on your computer and place it directly into SMART Notebook. Think about snapping a picture of a screen in another program and dropping it into your SMART Notebook file.
After the tutorials, make sure to check this tool out; it allows you to easily add images to your SMART Notebook file.
After the tutorials, make sure to check this tool out; it allows you to easily add images to your SMART Notebook file.
Tutorials/Readings/Hands-On Time

Videos- Please view these videos.
Two Minute Tutorial Objects in SMART Notebook 10
Two Minute Tutorial on the Gallery
The Gallery
Two Minute Tutorial Objects in SMART Notebook 10
Two Minute Tutorial on the Gallery
The Gallery

Handouts- Please read through these handouts.
Working with the Gallery
Collecting and Sharing Content- Using the camera for capturing images and more!
Working with the Gallery
Collecting and Sharing Content- Using the camera for capturing images and more!

Self- Skill Assessment
Now that you have worked through the tutorials, read the readings, and have spent some hands-on time on the SMART Board, please complete this self skill-assessment to make sure that you feel comfortable with all of the topics and skills that were covered.
If you find that you need more time, before moving on, please review the Tutorials/Readings/Hands-On section before moving onto the next lesson.
Skill Assessment
If you find that you need more time, before moving on, please review the Tutorials/Readings/Hands-On section before moving onto the next lesson.
Skill Assessment
