Lesson #2: Smart Notebook Introduction
Now that you have learned the basics of the SMART Board, we will now take the time to learn how to use The SMART Notebook Program. Smart Notebook is an extensive whiteboard program. It can serve as your chalkboard in your class, just open the software and pick up the pen and write. All you have to concentrate on is teaching….just pick up a pen and write.
You can also build lessons ahead of time so that you can present your lesson and create interactive segments to use with your students. Through Lesson #2 and Lesson #3, you will spend time learning all about SMART Notebook. It will become one of your go-to programs in your classroom- guaranteed!
SMART Technologies has published a helpful guide to walk you through the software. If you think it may be helpful, you may want to print a copy of the entire manual for your reference.
By the end of this lesson, you will be able to......
1....launch the SMART Notebook Program on your computer.
2....describe the tool bars and functions of each icon in the SMART Notebook Program.
3....add a new page to a SMART Notebook file.
4.....built a basic SMART Notebook file.
4....save, open, and print Notebook file.
2....describe the tool bars and functions of each icon in the SMART Notebook Program.
3....add a new page to a SMART Notebook file.
4.....built a basic SMART Notebook file.
4....save, open, and print Notebook file.
SMART Notebook: The General Layout
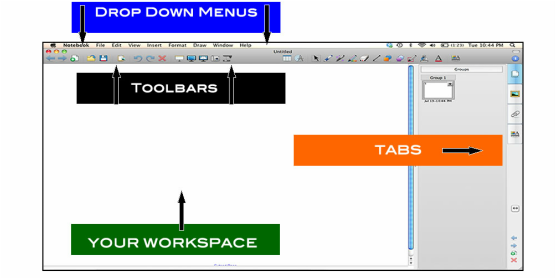
This is a screen shot of SMART Notebook 10. It is the newest version of SMART Notebook and was released in March 2011. The first step to getting comfortable with the software is to learn the different parts of the program. If you are familiar with working with other programs, some of this may look very familiar to you.
One thing to remember is that there is always more than one way to do a certain task. For example, If you would like to "save" a file, you could click on the picture of the picture of the disk in the toolbar or you could go to File---> Save As in the drop down menus.
Spend some time looking around what is avaibale in the drop down menus, toolbars, and tabs.
Check out the most important tools:

There are many different tools in the SMART Notebook Software. Take some time to study this image (left). Some of the most used important tools on the SMART Notebook Toolbar. You can click on the image to study it closer.
During your tutorial work listed below, make sure to spend lots of time experimenting with the functions of the different icons when working in SMART Notebook.
During your tutorial work listed below, make sure to spend lots of time experimenting with the functions of the different icons when working in SMART Notebook.
Tutorials/Readings/Hands-On Time
Videos- Please view these videos.
Two Minute Tutorial-Basics of SMART Notebook 10
Two Minute Tutorial- Page Sorter in Notebook 10
Many more video resources
Two Minute Tutorial-Basics of SMART Notebook 10
Two Minute Tutorial- Page Sorter in Notebook 10
Many more video resources

Self- Skill Assessment
Now that you have worked through the tutorials, read the readings, and have spent some hands-on time on the SMART Board, please complete this self skill-assessment to make sure that you feel comfortable with all of the topics and skills that were covered.
If you find that you need more time, before moving on, please review the Tutorials/Readings/Hands-On section before moving onto the next lesson.
Skill Assessment
If you find that you need more time, before moving on, please review the Tutorials/Readings/Hands-On section before moving onto the next lesson.
Skill Assessment
