Lesson #1: The Basics
Take a few minutes to think about our classrooms and students of today....What does your classroom look like? Are there big changes since ten or twenty years ago? Take a look at some videos about the classrooms and students of today.
A Vision of Students Today
Classroom of the Future
What is a Smart Board? Watch this video to find out!
After viewing the videos above, how do you think a SMART Board fits into the classroom of today? What are the advantages and disadvantages to having this technology in your classroom? If you are working with a partner ot group, please discuss these questions.
Now that you have thought about where a SMART Board may fit into a classroom, let's start learning about the basics of how to use this technology in your classroom.
By the end of this lesson, you will be able to......
- ...describe the components of a SMART Board set-up in your classroom.
- ....calibrate the SMART board.
- .....open any program/file on the SMART Board.
- .....use the pen functions to draw over or write on the program.
- ......launch the Internet on the Smart Board.
- ......describe how to clean the SMART Board.
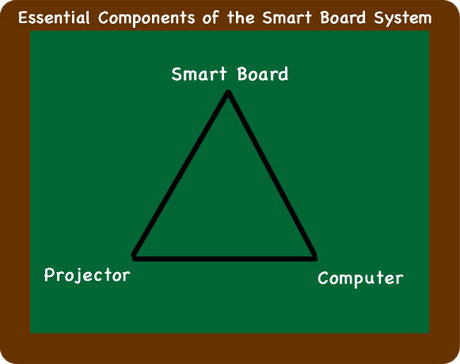
You may already have a SMART Board in your classroom. If you do, you have already noticed that there are three components to making a SMART Board work. Without any of these components, the system cannot fully function. Refer to the image below to study the three components that make up the SMART Board system.
Important Point:

The most important point is that a Smart Board is a touch screen of your computer. Whatever you can do on your computer, you can do on your SMART Board.
Take a minute to think about how much is available on your computer and imagine what it will be like to project all of that for your students on a big interactive screen at the front of your classroom.
Take a minute to think about how much is available on your computer and imagine what it will be like to project all of that for your students on a big interactive screen at the front of your classroom.
Tutorials/Readings/Hands-On Time
Videos- Please view these videos.
Two Minute Tutorial- Touch, Write and Save
How to clean the Smart Board? Video
Other Smart Tools
Two Minute Tutorial- Touch, Write and Save
How to clean the Smart Board? Video
Other Smart Tools
Handouts- Please read through these handouts.
Basic Functionality Handout
Basic Whiteboard Basics Handouts
Basic Functionality Handout
Basic Whiteboard Basics Handouts
Hands-on Time- Now, it's time to give it a try!
Hands-On Exercise
Hands-On Exercise
Self- Skill Assessment
Now that you have worked through the tutorials, read the readings, and have spent some hands-on time on the SMART Board, please complete this self skill-assessment to make sure that you feel comfortable with all of the topics and skills that were covered.
If you find that you need more time, before moving on, please review the Tutorials/Readings/Hands-On section before moving onto the next lesson.
Skill Assessment
If you find that you need more time, before moving on, please review the Tutorials/Readings/Hands-On section before moving onto the next lesson.
Skill Assessment
